Sunday 25 November 2012

Gilted pink

Ooh I'm back on my sofa catching up on X factor after a party weekend in London. My body is feeling a bit worse for wear after far too many drinks and definitely too much fast food from Camdem market, which always seems like such a good idea at the time. But hey my nails are still looking good!
This is a two coat base of Barry M Nail Paint in Black followed by a free handed pink inverted triangle in Max Factor Nailffinity in Disco Pink. Then I added a lovely gilted edge to define the pink triangles with a 17  nail art pot in Gold (this was from one of their Limited edition 'Hot Metals' nail art kits).

As always, I finished off with a good coating on high shine quick dry top coat - this time I used INM Out the Door.

Right I'm off to drown myself in carbs before detox Monday arrives.

Happy painting... the nailist xxx

Wednesday 21 November 2012

Lucky dip favourites

So as I mentioned on my last post there was a charity nail polish lucky dip at work. I've been working my way through my haul and here's a few of my favourites.

The base grey is Models Own in Mushroom and the two lines are Butter London in Artful Dodger (turquoise) and Dahling (dusky pink). I particularly love the Models Own one - might try it with a matte top coat next time.

I started with the grey all over the nail then free hand added the layers of colour so the top part of my nail has basically got 4 coats of colour. Just make sure you let it dry between coats otherwise it will be too thick to dry.

Finished off with a coat of Save the Nail 45 second top coat.

Happy painting... the nailist xxx

Sunday 18 November 2012

Stripe out

It's been a week since my last post because I've had a busy busy week with no time to do my nails - shocking I know! The main culprit is putting in some extra hours at work but I also went to my first yoga class on Tuesday (only just stopped aching but loved it!) and also out for obligatory Thursday night cocktails (Thursdays are the new Fridays!).

Low light of the week was my thumb nail breaking and taking some skin with it (youch!). Highlight of the week was Children in Need charity day at work in which there was a 50p nail polish lucky dip - imagine my excitement! I was by far their best customer and while doing my bit for charity bagged myself around 10 new polishes. Favourites were some Butter London (love this brand) and a couple of Bad Apple polishes which, as far as I know, are fast becoming popular - or I might just be behind the curve, who knows! Anyway, one of them features in today's post...
The base colour is two coats of No7 Stay Perfect in Me Me Me! then, nail by nail, angled striping tape followed by a coat of Bad Apple in 3D Arkansas. Make sure you tape is stuck down right to the edges before applying the top colour and also be sure to peel it off almost straight away before the paint starts to dry. Hopefully you can see from the pic that the Bad Apple Arkansas is a lovely iridescent turquoisey pink.

Sorry about the ugly thumb  - makes me look like I have man hands :o(

Finished with a top coat of Seche Vite quick dry.

Happy painting... the nailist xxx

Sunday 11 November 2012

Falling to pieces

Quick post today as I must go to bed at a decent hour. After a lovely weekend visiting the parents and basically eating, I've watched X Factor and have now vowed to get a good night's sleep. However, I know I'm myself as my sister and I are currently addicted to playing scrabble and hangman against each other via Facebook! Seriously, we can't put it down and are ever so slightly obsessed... she's the hangman queen but I usually wipe the floor with her on scrabble. Reading that back we sound like complete losers... I promise you we're actually quite interesting, trendy and cool people... honestly!

Anyway, enough of my rambling.. tonight's post is something I saw on a YouTube tutorial a while a go and have been meaning to try.
I started with a base of Models Own in Fuzzy Peach then free hand painted the black squares with Barry M Nail Paint in Black. If you struggle painting free hand then you can either add some guide lines with a nail art pen or you could try using sellotape to tape off the squares. Just make sure you wait till the base colour is completely dry before taping and then once you've painted the black pull off the tape before it dries.

Then using a dotting tool I simply added dots to create the jigsaw connections. Quite simple really.

Finished off with a coat of Seche Vite quick dry top coat.

Happy painting... the nailist xxx

Thursday 8 November 2012

Mixed up monochrome - Nailed It's Two Bottle Challenge

Hey peeps

The first challenge of the week was Polish Days' MAN-icure, now it's time for Nailed It's 'Two Bottle Challenge' to celebrate the blog's one year anniversary and reaching an amazing 555,555 views, whoop!

The rules are simple - use two bottles of polish to create a design without the use of stamping or embellishments. You are allowed to mix the colours to create more colours but for me it had to be plain black and white because I love the monochrome look and you can create really striking designs. I also love mixing up designs because I'm a girl who wants it all - not just happy with the one design so I get carried away. So here it is...
My two bottles were Models Own Pro in French White and Barry M Nail Paint in Black. I used striping tape to create the straight lines on the ring finger and a dotter for the polka dots, but everything else is free handed.

I then did the same designs but mixed them up on my right hand...

I love it! Hope you do too. Head over to Nailed it to check out the other entries and of course her fab blog. Happy Blogiversary Nailed it!

Happy painting.. the nailist xxx

Tuesday 6 November 2012

Polish days - MAN-icure

It's Polish Day time!.. the monthly blogger event put together by Hannah @ PollyPolish.com. This month's theme is MAN-icure in honour of it being Movember. The brief was either a the iconic moustache design or a tribute to any special men in your life.

I decided to go literal and simple....

I had a bit of trouble with the moustaches due to a gloopy black nail polish but no time to redo unfortunately! Still loving it though - makes me laugh every time I look at my nails.

And what makes me giggle even more is that if I look at them the other way the moustaches, unintentionally, look like eyebrows and I have angry/surprised faces looking back at me!

I opted for muted 'manly' base colours:-
Thumb - Nail Polish by H&M in Nerd
Index - W7 in 29 Grey
Middle - Models Own in Concrete Mixer
Ring - Bourjois 1 Second Gel Silicone Texture in 04 Taupe Classy
Little - Bourjois 10 days No Chips in shade 23

Happy painting.. the nailist xxx


Friday 2 November 2012

Baby you're a firework - or not in this case!

After the success of my Halloween nail design, I set my sights on creating something fab for Bonfire night. EPIC FAIL!

I still think my idea was a good one but the execution not so much. I intended on doing a half moon design which looked like a Catherine Wheel firework but I've ended up with regular old bonfires!

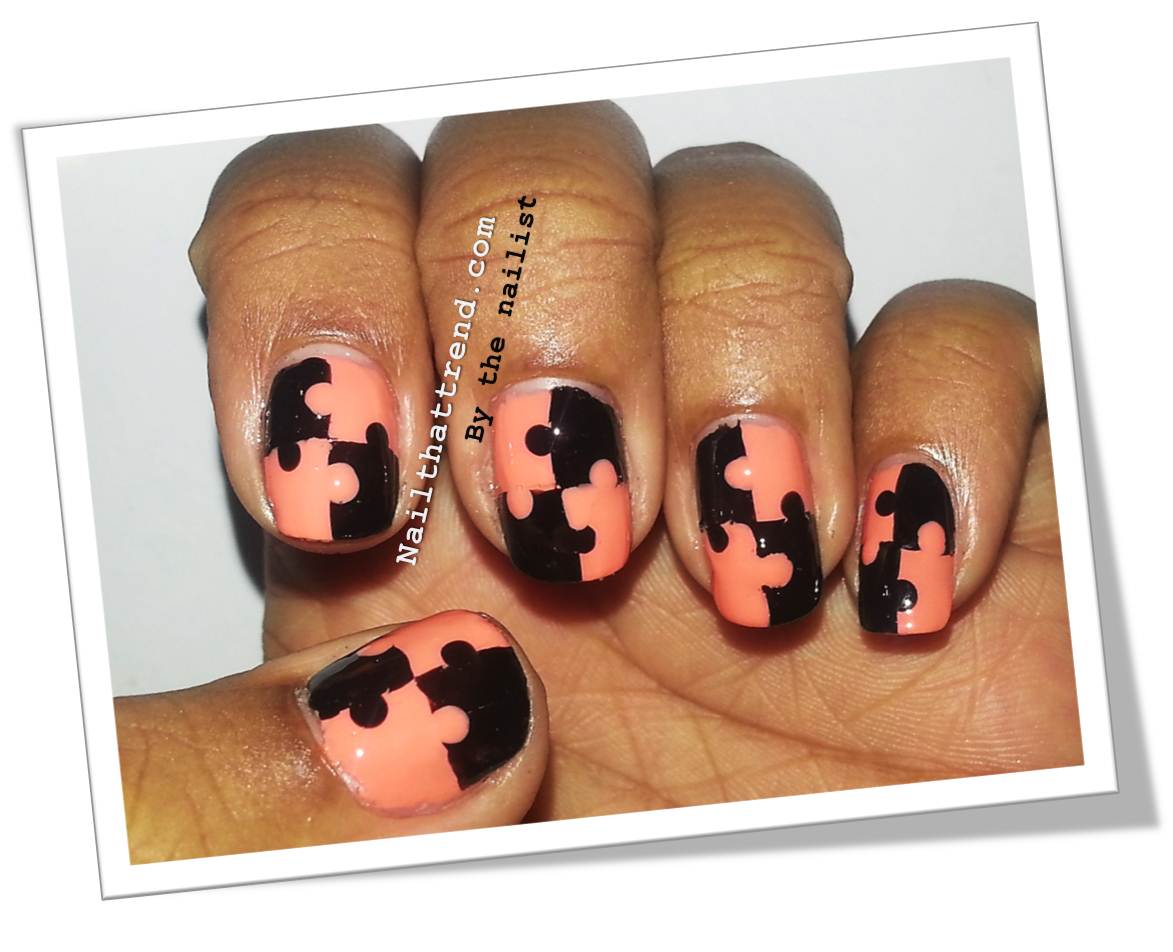
Apologies for the very dodgy photo - they were a nightmare to take without flash glare so I've had to do a bit of post light balancing which isn't great at all - they are a lot more glittery and fire like in the flesh! Also you may notice my thumb nail is looking a bit worse for wear around the edges - I've got a really low break, too low to cut off (ouch!) so I've had to put a silk wrap on to hold it together but the brush-on gel (basically the essential bit which makes it all bind together) was all dried up. So I just had to cover the silk bit with base coat, which of course doesn't really work! I give myself a hour tomorrow before I end up with a painful ripped off nail.

Anyway, all in all not my finest work but topical all the same.
I started with a base of Estee Lauder Pure Colour in 20 Perfect Storm. Then once dry went over this with Barry M Nail Paint in Black Multi Glitter, leaving a semi circle of the base colour exposed at the base of the nail.

I then just built up the sparks of a variety of colours, creating flicks with a striping brush:-
Barry M Nail Paint Instant Effects in Gold Foil
17 Fast Finish in Potion
17 Fast Finish in Fury
17 HoloNial Polish in Silver
No7 Speed Dry in Queenie (this is the small flashes of red/pink)
Barry M Nail Paint in Silvery Lilac
LA Splash Nail Polish in Midnight Rain
No7 Stay Perfect Limited Edition in Golden Palms ( I used this one to define the edge of the half moon too)

Here's a pic of the whole kit


As always, finish off with a top coat to protect the design - I used INM Out the Door

Happy painting... the nailist xxx